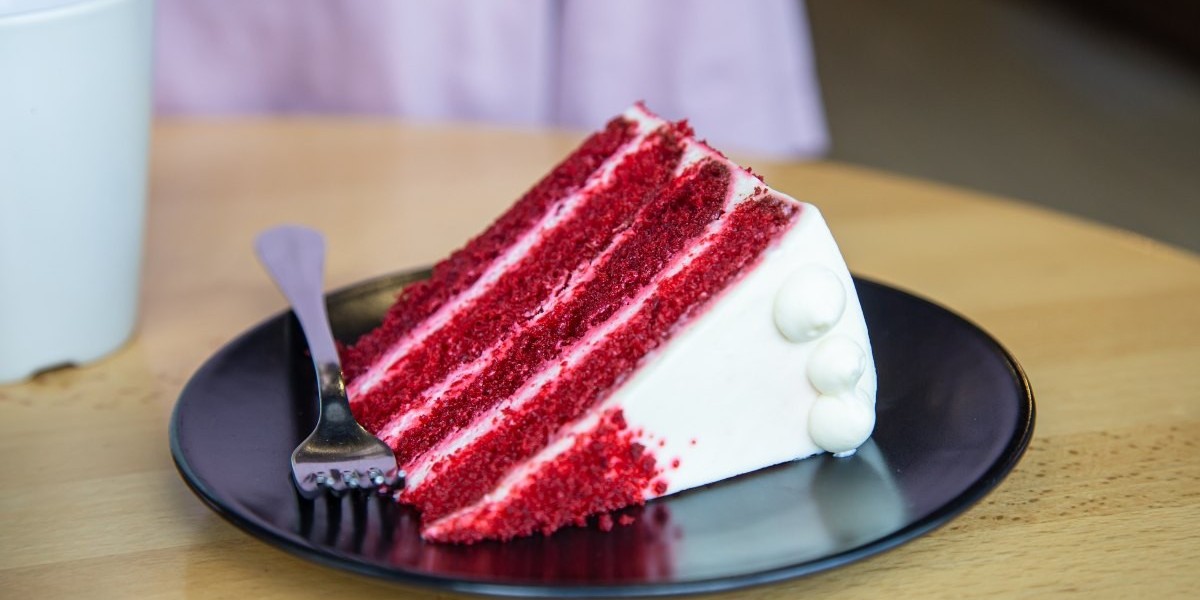

Few desserts turn heads like a slice of deep crimson cake stacked with snowy cream cheese frosting. Red velvet has shown up at birthdays, Valentine's Day tables, and holiday dessert spreads for generations. Yet many home bakers still ask the same questions. What actually gives it that signature flavor? Why do some versions turn out dry? How do you get a vivid color without a bitter aftertaste?
This guide answers all of it. You will find the history, the science behind the texture, a step-by-step recipe, troubleshooting help, flavor variations, storage advice, and a detailed FAQ. Whether you want a Classic Red Velvet Cake for a milestone birthday or a Homemade Red Velvet Cake for a quiet Sunday bake, everything you need is below.
What Is Red Velvet Cake?
Red velvet cake is a layered American-style dessert known for its ruby-red crumb, delicate cocoa flavor, and tangy cream cheese frosting. It sits somewhere between a vanilla and a chocolate cake: it has a whisper of cocoa, but it is not a chocolate-forward bake. The name "velvet" refers to the fine, plush crumb that melts on the tongue.
A Short History of the Velvet Crumb
The "velvet" label dates back to the 1800s, when bakers used the word for cakes with a soft, smooth texture. Early versions used cocoa that reacted with acidic ingredients, which naturally gave the crumb a reddish tint. When cocoa processing changed, the natural color faded, and bakers began adding red coloring to keep the look people loved. Over the twentieth century, red velvet became a Southern favorite and later a national classic, now a fixture of weddings, bakeries, and home kitchens across Canada and the United States.
What Does It Taste Like?
Expect a gentle buttery sweetness, a faint cocoa note, and a subtle tang from buttermilk. The cream cheese frosting adds a cool, creamy contrast. People often describe the flavor as "almost chocolate, but lighter."
How It Differs from Chocolate Cake
A standard chocolate cake leans on a generous amount of cocoa for deep, bold flavor. Red velvet uses only a spoonful or two, so the buttermilk and vanilla get to shine. If you want to compare the two side by side, try baking this moist chocolate cake on another day and notice how much richer and darker the crumb tastes.
Why This Cake Works: The Science of the Velvet Crumb
Understanding why each ingredient is there makes you a more confident baker. It also helps you troubleshoot when something goes wrong.
Buttermilk and Vinegar Create Tenderness
Both ingredients are acidic. Acid softens gluten strands, which keeps the crumb tender instead of chewy. The acid also reacts with baking soda to create lift, giving you even, fluffy layers. This is the core reason a good Red Velvet Cake feels so plush.
Color Is Mostly Cosmetic
Food coloring does not add flavor, but too much liquid coloring can add bitterness and extra moisture. Gel coloring is more concentrated, so you can use less and still get a bold red.
Ingredients You Will Need
Set everything out before you start. Cold eggs or buttermilk can cause a lumpy batter and uneven baking, so let them sit on the counter for 30 minutes.
For the Cake (two 9-inch round layers)
2½ cups (310 g) all-purpose flour
1½ cups (300 g) granulated sugar
1 tablespoon (about 8 g) unsweetened cocoa powder
1 teaspoon baking soda
1 teaspoon fine salt
1 cup (240 ml) neutral oil, such as canola or vegetable
1 cup (240 ml) buttermilk, at room temperature
2 large eggs, at room temperature
1 tablespoon red gel food coloring (or 2 tablespoons liquid)
1 teaspoon pure vanilla extract
1 teaspoon white vinegar
For the Cream Cheese Frosting
8 oz (227 g) full-fat block cream cheese, softened
½ cup (113 g) unsalted butter, softened
3½ cups (420 g) icing sugar (powdered sugar), sifted
2 teaspoons pure vanilla extract
Pinch of salt
Ingredient Notes and Substitutions
No buttermilk? Stir 1 tablespoon of lemon juice or white vinegar into 1 cup of milk and let it sit for 5 minutes.
Cream cheese: Choose the block kind, not the spreadable tub. Tub cream cheese contains more water and makes a runny frosting.
Natural color option: Beet powder can tint the batter, though the shade will be a deeper maroon than classic bright red.
Easy Red Velvet Cake Recipe: Step-by-Step
This Easy Red Velvet Cake Recipe needs only two bowls, a whisk, and a spatula. Total time is about 1 hour 30 minutes, including cooling. It serves 12 generous slices.
Step 1: Prep Your Pans and Oven
Heat your oven to 350°F (175°C). Grease two 9-inch round pans, line the bottoms with parchment, and lightly flour the sides. Parchment is not optional here. It guarantees a clean release.
Step 2: Mix the Dry Ingredients
In a large bowl, whisk the flour, sugar, cocoa, baking soda, and salt until evenly combined. Sifting is a nice extra step because cocoa tends to clump.
Step 3: Mix the Wet Ingredients
In a second bowl or large measuring jug, whisk the oil, buttermilk, eggs, food coloring, vanilla, and vinegar until smooth and uniformly red. Streaks of white mean the buttermilk and oil are not fully blended.
Step 4: Combine Gently
Pour the wet mixture into the dry. Fold with a spatula until just combined. A few small lumps are fine. Overmixing develops gluten and leads to a tougher cake.
Step 5: Bake
Divide the batter evenly between the pans. Tap each pan firmly on the counter to release large air bubbles. Bake for 28 to 32 minutes, until a toothpick inserted in the center comes out clean or with a few moist crumbs. The top should spring back lightly when touched.
Step 6: Cool Completely
Cool in the pans for 10 minutes, then turn out onto a wire rack. Let the layers cool fully, at least 1 hour, before frosting. Warm cake melts frosting and slides apart.
Step 7: Make the Frosting
Beat the butter on medium speed for 2 minutes until pale and creamy. Add the cream cheese and beat just until smooth. Over-beating cream cheese can thin it out. Add the icing sugar a cup at a time on low speed, then the vanilla and salt. Beat on medium for about 1 minute until fluffy. If it seems soft, chill it for 15 minutes.
Step 8: Assemble
Place the first layer on a serving plate and spread about 1 cup of frosting over the top. Add the second layer, then frost the top and sides. For a rustic look, swirl the frosting with the back of a spoon. For a polished look, apply a thin crumb coat first, chill for 20 minutes, then add a final layer.
Common Problems and How to Fix Them
The Cake Is Dry or Crumbly
The usual culprits are too much flour, overbaking, or oven temperature that runs hot. Weigh your flour and shorten the bake time by a few minutes next time.
The Color Looks Dull or Brownish
The batter may have too much cocoa, or you used too little coloring. Gel coloring gives the most reliable results. Keep the cocoa to one tablespoon.
The Layers Sank in the Middle
This can happen if the oven door was opened too early, the baking soda was old, or the batter was overmixed. Keep the door shut until at least the 25-minute mark.
Flavor and Format Variations
Once you have the base recipe down, you can adapt it to nearly any occasion.
Cupcakes
Fill liners two-thirds full and bake at 350°F (175°C) for 18 to 22 minutes. This recipe makes about 18 cupcakes.
Sheet Cake
Bake in a 9x13-inch pan for 35 to 40 minutes. This is ideal for potlucks and school events.
Mini Loaf or Bundt
For a Bundt pan, grease generously and bake for 45 to 55 minutes. For mini loaves, check at 25 minutes.
Marbled Version
Swirl half the red batter with vanilla batter for a striking two-tone slice. If you like that look, the technique is similar to this marble cake recipe, which walks through swirling two batters cleanly.
Lighter Frosting Options
Whipped cream frosting: Whip cold heavy cream with icing sugar and a little vanilla. Light and airy, but it must stay refrigerated.
Ermine frosting: A cooked flour-and-milk base whipped with butter. Less sweet and very smooth.
Mascarpone frosting: Rich and mellow, a great option if you find cream cheese too tangy.
Dietary Adjustments
Dairy-free: Use plant-based buttermilk (soy milk plus vinegar) and dairy-free cream cheese and butter.
Gluten-free: Swap in a cup-for-cup gluten-free flour blend that contains xanthan gum.
Egg-free: Replace each egg with ¼ cup of unsweetened applesauce, though the crumb will be slightly denser.
What to Serve With It and Flavor Pairings
Rich cake loves contrast. Fresh raspberries or strawberries cut through the sweetness. A cup of black coffee or hot tea balances the cream cheese. For a festive dessert board, add chopped nuts as a garnish. Crushed pistachios look especially pretty against the white frosting, and if you enjoy that nutty note, you might love this pistachio cake recipe as another showstopper for your table.
Occasions That Suit It
Valentine's Day and anniversaries
Christmas and New Year's gatherings
Birthdays and baby showers
Canada Day or Fourth of July, topped with berries for a red-and-white look
Storing, Freezing, and Making Ahead
Because of the cream cheese frosting, a frosted cake should be kept cold for food safety.
Room temperature: Up to 2 hours while serving.
Refrigerator: Store covered for up to 4 days. Let slices sit at room temperature for 20 minutes before serving so the crumb softens and the flavor opens up.
Freezer (unfrosted layers): Wrap each cooled layer tightly in plastic wrap and then foil. Freeze for up to 3 months and thaw overnight in the fridge.
Freezer (frosted slices): Freeze on a tray until firm, then wrap individually for up to 1 month.
Make-ahead plan: Bake the layers up to two days early, wrap them, and frost on the day you plan to serve.
If you enjoy baking in advance for gatherings, a banana-based bake like this chocolate chip banana cake is another sturdy, make-ahead option that stays tender for days.
Approximate Nutrition Notes
A slice of frosted layer cake is a celebration dessert, not an everyday snack. Exact values depend on slice size and ingredients, so use a nutrition calculator with your specific brands for accurate numbers. To lighten things up, cut the cake into 16 smaller slices or serve it with fresh fruit.
Best Red Velvet Cake Recipe Checklist
Want to be sure you are following the Best Red Velvet Cake Recipe approach? Run through this checklist before you bake:
Ingredients are at room temperature.
Flour is weighed, not scooped.
Cocoa is limited to one tablespoon.
Gel coloring is used for the brightest shade.
Batter is folded gently, just until combined.
Layers are fully cooled before frosting.
Frosting uses block cream cheese and is chilled if it softens.
Hit all seven, and you will produce a Soft Red Velvet Cake with a tender crumb and balanced tang.
Final Thoughts
A great Red Velvet Cake is not complicated. It is a matter of simple ingredients, gentle mixing, patient cooling, and a generous swirl of tangy cream cheese frosting. Now that you understand why each ingredient matters, you can adapt the recipe into cupcakes, sheet cakes, or a showstopping layered centerpiece.
Frequently Asked Questions
What is the difference between red velvet and chocolate cake?
Red velvet uses only a small amount of cocoa and relies on buttermilk and vinegar for a subtle tang and an ultra-soft crumb. Chocolate cake uses much more cocoa for a deep, bold flavor.
Is Red Velvet Cake just chocolate cake with food coloring?
Not quite. The color is the most visible difference, but the flavor and texture are different too. The buttermilk, vinegar, and low cocoa level create a tangy, tender cake that tastes distinct from a standard chocolate version.
Why is vinegar in the recipe?
Vinegar adds acidity that reacts with baking soda to create lift, softens gluten for a tender crumb, and brightens the color. You will not taste it in the finished cake.